Best Desktop Computer Dust Removal Method and Tips
Are you wondering what is the best desktop dust removal method?
After using the computer for a period of time, programs tend to runs slower and slower. From time to time, there are blue screen of death, crashes, etc., and the noise of the computer is getting louder and louder. This is mainly caused by the accumulation of dust on your computer. How? Dust off the computer?
Desktop computer dust removal process
Dust removal inside the mainframe chassis
First, dust removal tools
1. brush or used toothbrush, brush.
2. paper towels, soft cloth and eraser.
3. blow the leather tiger, or screw the empty mineral water bottle to the top cover, use a pin to put a small hole in the cover for blowing.
4. detergent, cleaning paste or medical alcohol.
Second, the dust removal step
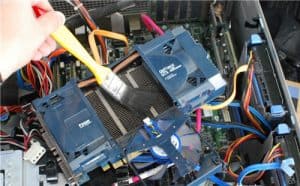
1. Radiator: Remove the CPU heat sink, then remove the fan of the heat sink (usually by plastic clips or screws), use the brush to clean the dust on the fan blades, and clean the front and back sides. Next is the heat sink. If the dust has accumulated in a group, it is recommended to reverse the radiator to the ground, shake off the large dust particles, and then use the brush to remove the rest. The graphics card heatsink can also be processed in the same way, but the heatsink of the graphics card is more difficult to disassemble. It requires a certain amount of hands-on ability. Ordinary players can do their best. If you can’t take it, use a brush to clean the fan and the dust of the large group.
2. Board: In addition to the radiators everywhere are gaps, the board is full of components is the same as eating big. It is recommended to remove the motherboard from the chassis and clean it. In addition, the memory and PCI-E slot, SATA interface should also be cleaned, which is easy to accumulate, which will cause poor contact when the graphics card or memory, SATA cable is plugged in again.
3. Chassis: It is best to take all the accessories out of the chassis, do a thorough cleaning, if some parts are really dirty, you can use a semi-wet rag with detergent to clean.
4. Other ash accumulated on the outer casing of equipment such as hard disk and optical drive, wipe it off with a slightly damp rag, and then wipe it with a dry rag. Do not wipe the bare circuit board part with a wet rag.
5. The radiator, board, chassis and other places are wiped clean, after the air drying can be reorganized.
Computer dust removal precautions
 First, do not hit the picture tube or force the tail, otherwise it will easily cause damage or even burst of the picture tube.
Second, when cleaning the dust or carbon particles on the side of the high pressure nozzle, it is especially careful to remove it thoroughly, and do not wipe off the graphite layer on the picture tube. Do not use cotton or a plush cloth to clean the area, as the hair falls on the high pressure nozzle and can cause discharge when it is turned on.
Third, do not peel the high-pressure cap head clean, because it stores high-voltage electricity to prevent injury.
4. It is not possible to clean the main board and display circuit board with gauze, so as to avoid the yarn hook damage components.
5. During the cleaning process, be careful not to move the deflection coil at the end of the picture tube, correct the magnetic piece, and the jumper of the motherboard. Otherwise, it will affect the image quality or cause human error, and at the same time, do not use the component to clean the component. A short circuit between them causes an accident.
The above points are the relevant information of the desktop computer dust removal method for everyone. You can also search online forums as there are thousands of computer experts to interact online, all type of problems can find answers there. See how others solve it!
Contact us if you need any desktop repair service.